
How to Upload Bulk Contacts via CSV in PawnCRM
Managing contacts one by one slows your team down. With PawnCRM’s bulk upload feature, you can import thousands of contacts from a CSV file in minutes — complete with automatic validation, duplicate detection, and tag assignment.
This step-by-step guide walks you through the entire process of uploading bulk contacts to PawnCRM, from preparing your CSV file to reviewing your import results.
What You’ll Need Before You Start
- A CSV file with your contacts (columns for first name, last name, email, and phone number)
- A PawnCRM account with contacts permission
- Optionally: a contact list and tag already created in PawnCRM
Tip: You can download a CSV template directly from the upload screen to make sure your file is formatted correctly.
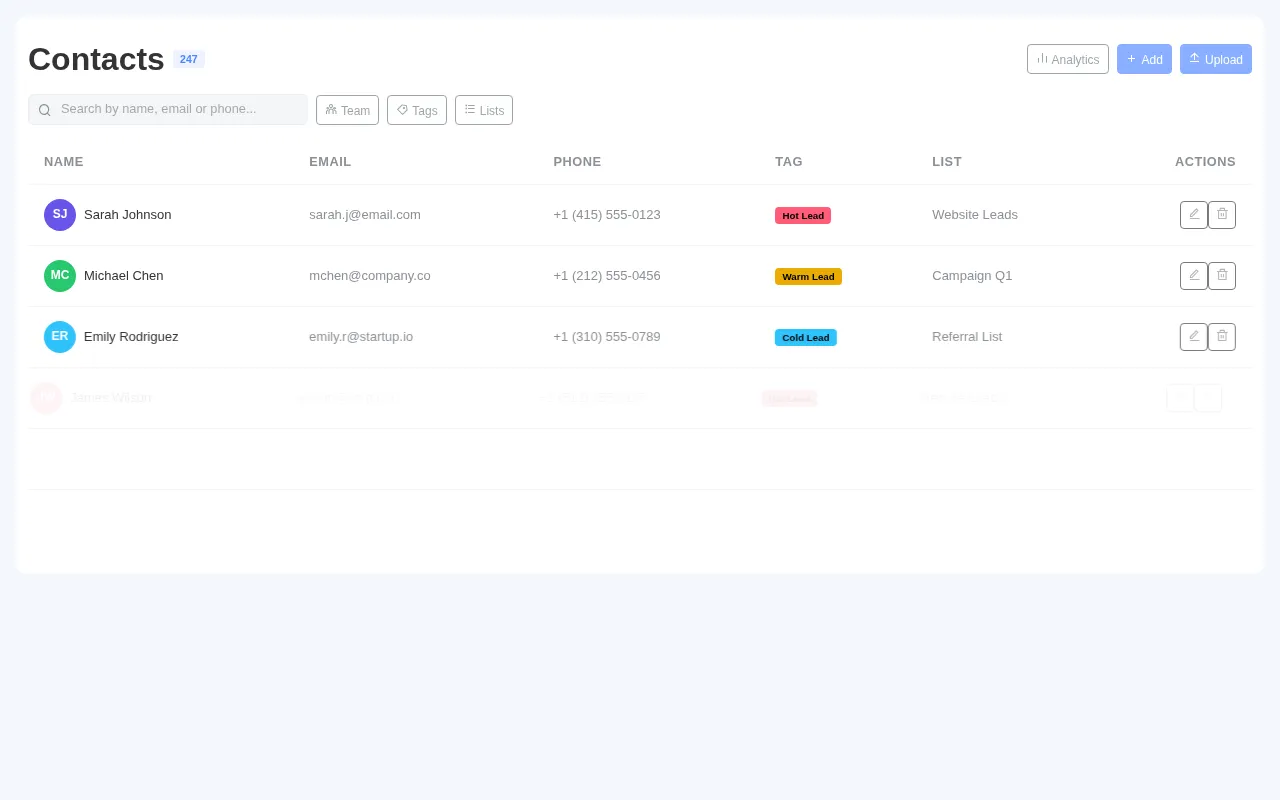
Step 1: Open the Contacts Page
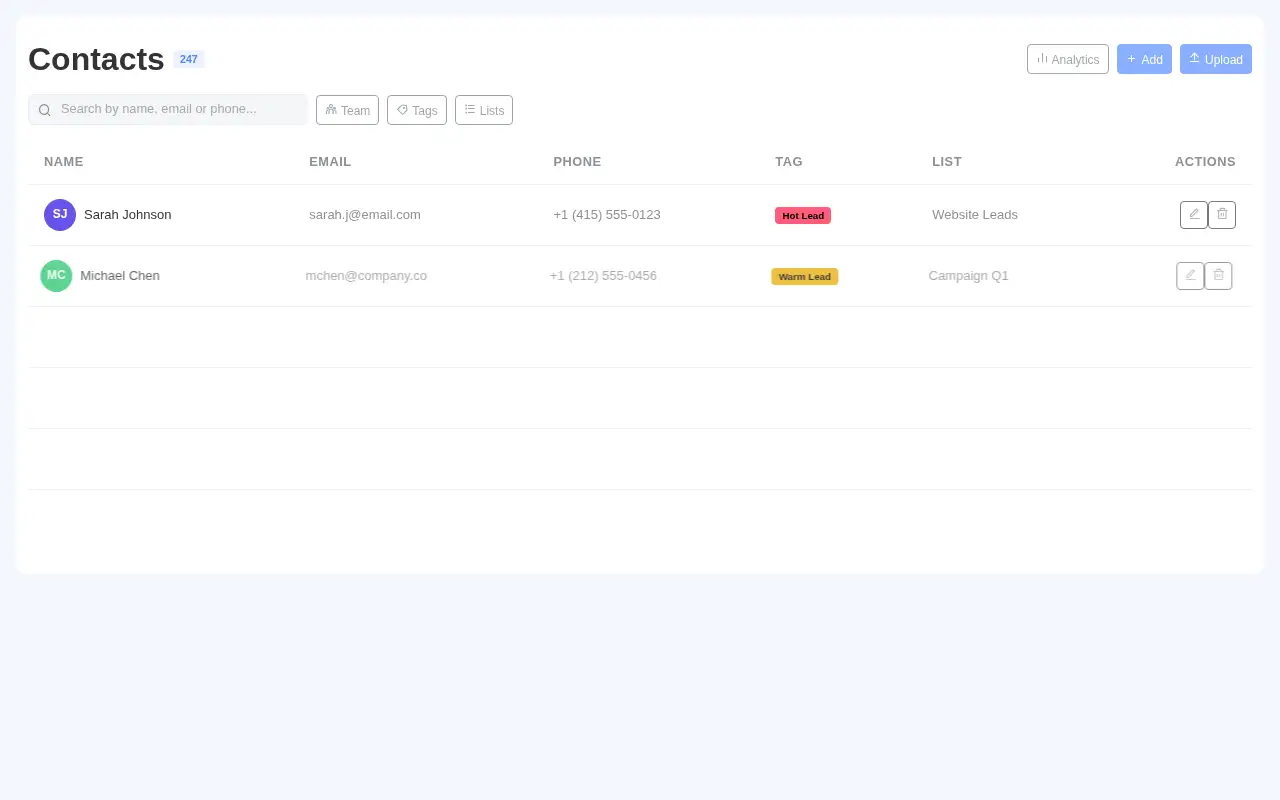
Navigate to the Contacts page from the sidebar. You’ll see your existing contacts listed in a table with their name, email, phone, tags, and assigned list.
Click the “Upload” button in the top-right corner to start the bulk import wizard.
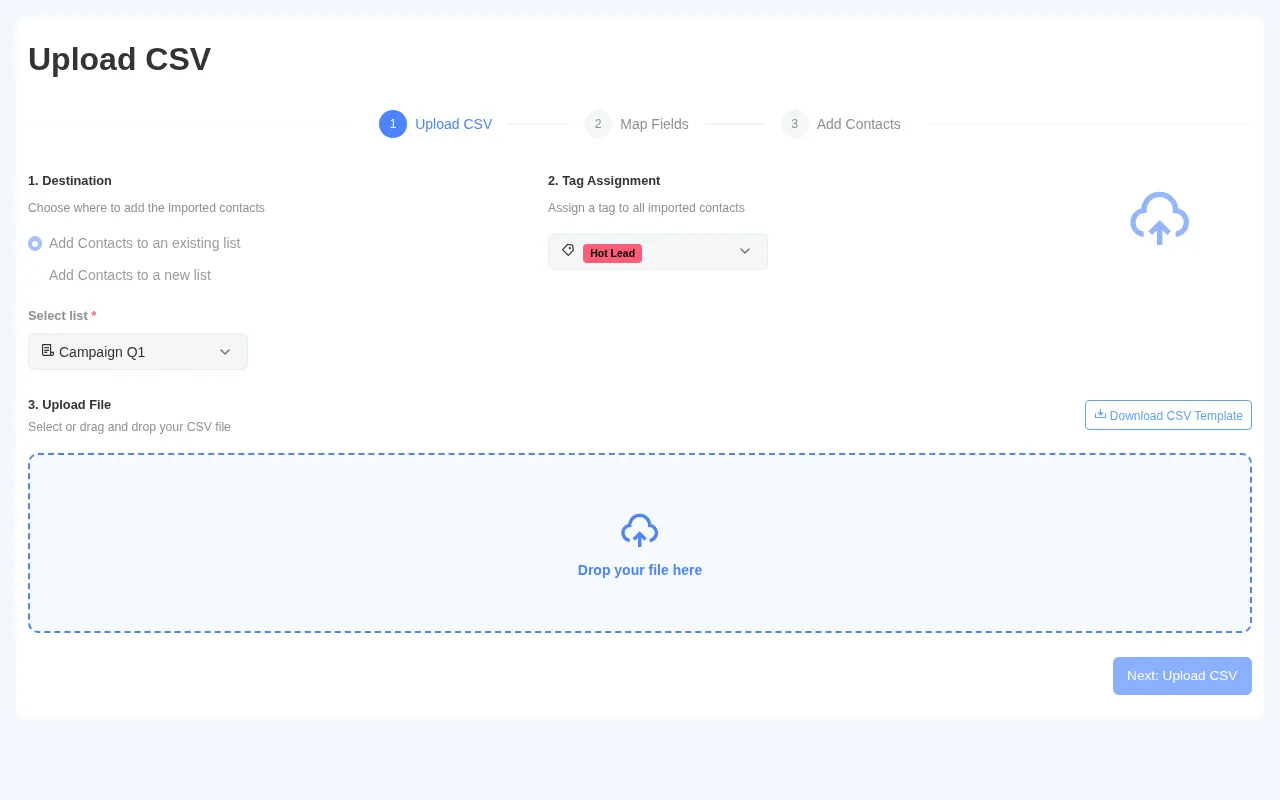
Step 2: Choose a Destination List
The upload wizard opens with a 3-step process: Upload CSV → Map Fields → Add Contacts.
First, choose where your imported contacts will go:
- Add to an existing list — select from your current contact lists (e.g., “Campaign Q1”, “Website Leads”)
- Create a new list — name a new list on the fly
Select your destination list from the dropdown. Each list shows how many contacts it already contains, helping you pick the right one.
Step 3: Assign a Tag
Next, assign a tag to all contacts being imported. This is useful for segmenting your contacts later — for example, tagging everyone from this import as “Hot Lead” or “Event Attendee”.
Select a tag from the dropdown. The tag will be applied to every contact in the CSV file.
Step 4: Upload Your CSV File
Now upload your file. You can either:
- Drag and drop your CSV file into the upload area
- Click “select a file” to browse your computer
Only .csv files are accepted. Once selected, you’ll see the filename and a green confirmation. Click “Download CSV Template” if you need a pre-formatted template.
Click “Next: Upload CSV” to proceed to validation.
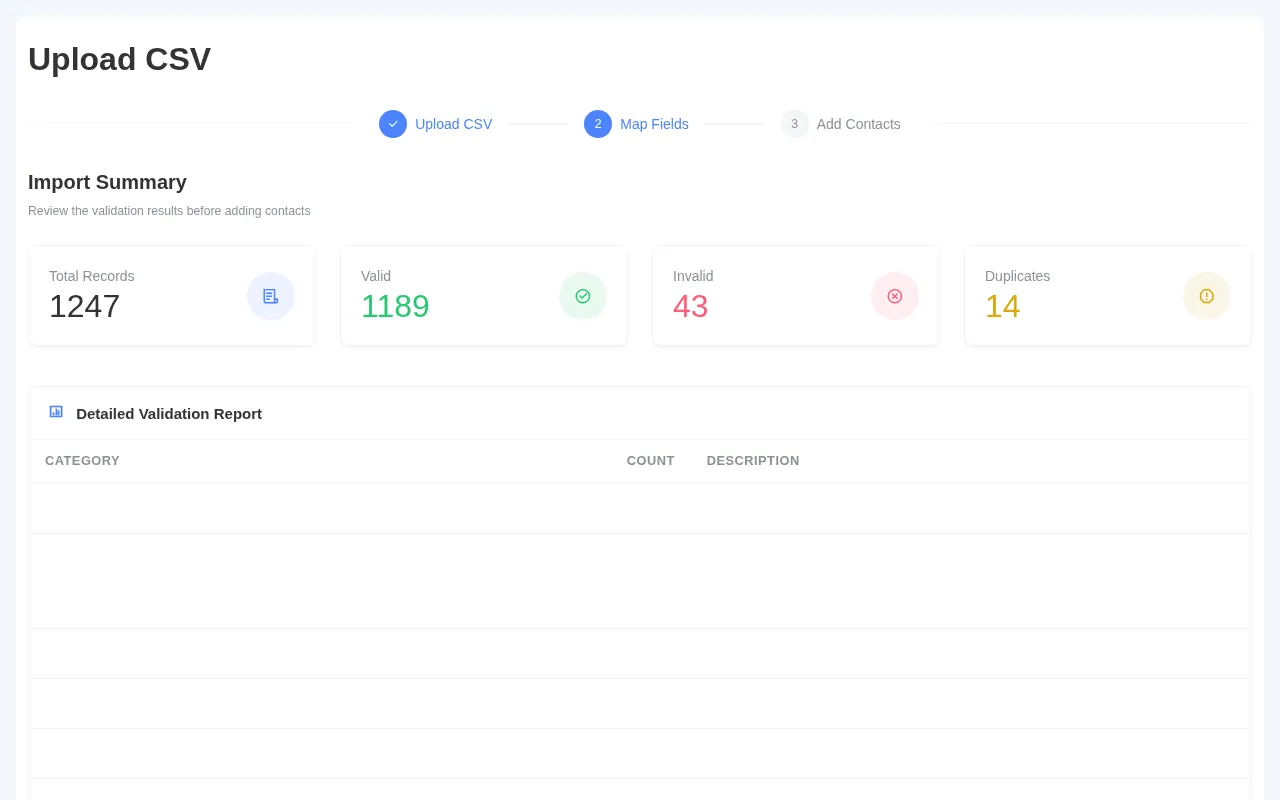
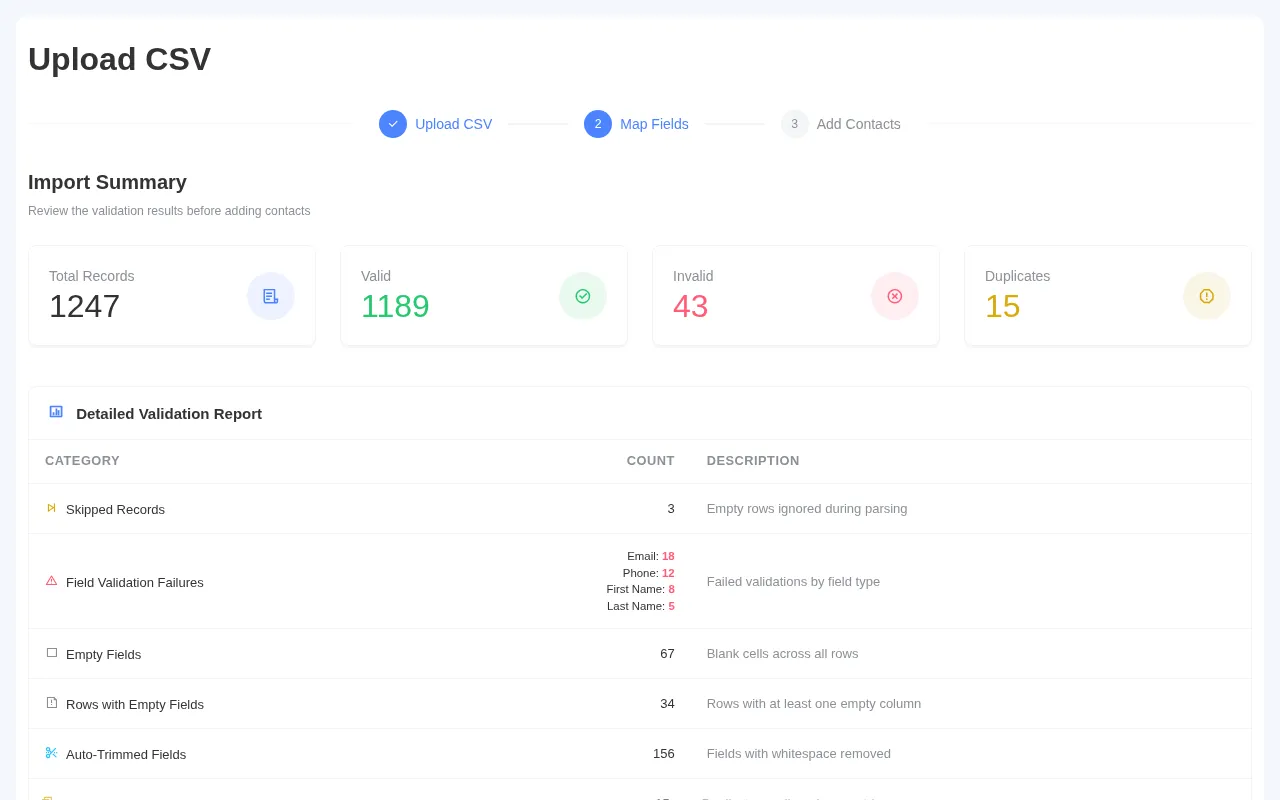
Step 5: Review the Import Summary
After uploading, PawnCRM automatically validates every record in your CSV. The import summary shows four key metrics:
- Total Records — the number of rows in your CSV
- Valid — contacts that passed all validation checks
- Invalid — contacts with errors (bad email, missing fields, etc.)
- Duplicates — contacts that already exist in your system
Step 6: Check the Validation Report
Below the summary, the Detailed Validation Report breaks down exactly what was found:
- Skipped Records — empty rows ignored
- Field Validation Failures — broken down by email, phone, first name, last name
- Empty Fields — blank cells across all rows
- Auto-Trimmed Fields — whitespace automatically cleaned up
- Duplicates Removed — duplicate entries excluded
This helps you identify data quality issues. Click “Next: Add Contacts” to finalize the import.
Step 7: Contacts Are Added
PawnCRM processes your valid contacts and adds them to the selected list. You’ll see a success confirmation when complete.
From here you can:
- View Contacts — see your newly imported contacts in the list
- Done — close the wizard and continue working
See It in Action
Here’s the complete bulk upload flow animated from start to finish:
Tips for a Smooth Import
- Use the CSV template — download it from the upload screen to ensure correct formatting
- Clean your data first — remove blank rows and fix typos before uploading
- Check email formats — malformed emails are the most common validation failure
- Use tags strategically — tag imports by source (e.g., “Trade Show 2025”) for easy filtering
- Start small — test with 10–20 contacts first to verify your CSV format
What Happens After Import?
Once imported, your contacts are immediately available across PawnCRM:
- Send campaigns — include them in email or SMS campaigns
- Start conversations — message them from the chat module
- Assign to team members — distribute across your sales team
- Track activity — view interaction history on each contact’s profile
Ready to import your contacts? Log in to PawnCRM and head to the Contacts page to get started.
Related Articles
Continue exploring PawnCRM with these guides: